IIDXOLLER Options Manual
1. Introduction to IIDXOLLER Options
The DAOdesign team created this software based on years of experience.
If you encounter any problems during use or have other suggestions, please contact us via email or Twitter and we will actively improve it.
A variety of modes are pre-made, and different parameters can be set in different modes, which is convenient and quick.
2. Download
Please use it after completely decompressing it, and do not run it directly in the compressed package.
3. Firmware Burning
- USB type-B ports 1P and 2P must be connected at the same time
- Click the Open button
- Select the
SS900_RED-LMS_xxxxx.skystarfirmware in the folder - Click the Update button
- Complete
- During the upgrade process, be sure to keep the USB connected. If the USB type-B is disconnected during the upgrade process, the main control PCBA may not be able to burn the firmware again.
- If it prompts that the burning fails, please burn again.
4. Usage Guidelines
IIDXOLLER Options provides powerful parameters that can be customized according to your preferences.
It can already adapt to most IIDX games under full default settings.
4.1 Software Interface

| Area | Function |
|---|---|
| A | Mode switch, sleep mode, language |
| B | Global function settings |
| C | Preview Window |
| D | Firmware preview, firmware burning |
| E | Mode Settings |
| F | Turntable weight settings |
4.2 Mode Switch, Sleep, Language

| Item | Description |
|---|---|
| A1 | Mode switch button; select A2 first, then click the button to apply |
| A2 | Mode list |
| A3 | Whether 1P is connected; displayed in gray if not connected |
| A4 | Whether 2P is connected; displayed in gray if not connected |
| A5 | Ignore Windows scaling; if 125%, 150%, or 200% is set in Windows, force display at 100% |
| A6 | Sleep function; after setting, RED-LMS will turn off all lights after 1–10 minutes. Press any button or rotate the turntable to restore lights |
| A7 | Select your preferred language; languagepack.xml can be freely modified to add your own language |
4.3 Global Function Settings
4.3.1 Global - Button Settings

| Item | Description |
|---|---|
| B1 | Debounce time when microswitch is released; recommended default 3ms. If VX-01-1C22 or VX-01-1C23 microswitches show multiple responses, increasing this value may partially improve it |
| B2 | Debounce time when microswitch is pressed; recommended default 10ms. If VX-01-1C22 or VX-01-1C23 microswitches show multiple responses, increasing this value may partially improve it |
| B3 | Time for the button light to turn off after the key is released; typically recommended 0–200ms |
| B4 | Restore button settings to factory defaults |
- B1+B2 < 50ms; this is an estimated value. It is related to the maximum frequency of a single button; typically, a single button press speed is less than 20 times/second.
- For multiple responses from VX-01-1C22 or VX-01-1C23, increasing the B1+B2 time can alleviate some issues. If multiple responses still occur, it is recommended to replace the microswitch promptly.
4.3.2 Global - Turntable Settings
It looks a bit complex, but in practice, B7 and B8 are the most commonly adjusted.
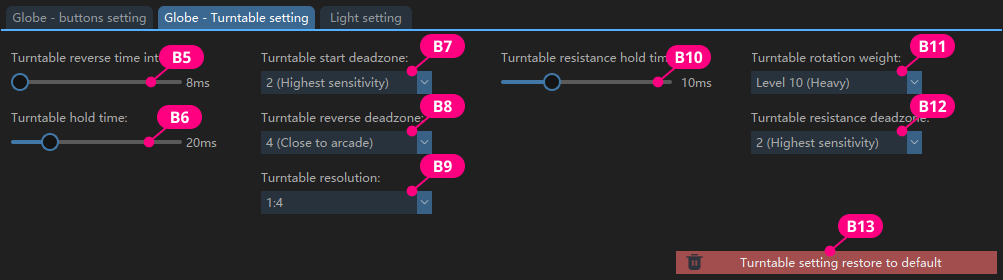
| Item | Description |
|---|---|
| B5 | Turntable pullback time interval. Only when using EZ2ON and the turntable is set to 2 key values, set to 8ms or higher; otherwise, inputs may be missed with high-speed turntable in EZ2ON. Recommended default: 0ms |
| B6 | Recommended value: 20–100ms; smaller values require faster speed to trigger the turntable; larger values allow slower speed. Recommended default: 100ms |
| B7 | Can be understood as sensitivity; smaller values mean higher sensitivity. The value represents how many degrees the turntable needs to turn to output a value. Recommended default: 6 (our testing finds 6 closest to arcade feel); can be fine-tuned. Scratch-focused players can set to 2 |
| B8 | Pullback sensitivity; smaller values mean higher sensitivity. Represents how many degrees the turntable needs to turn back to output a value. Recommended default: 4; can be fine-tuned |
| B9 | At 1:2, lower turntable speed can trigger fast scrolling in the song selection menu; at 1:4, higher speed is needed. Recommended default: 1:4 (our testing finds 1:4 closest to arcade feel) |
| B10 | Time for turntable damping to trigger. If too small, no damping effect when rotating slowly; at critical speed, turntable feel may feel jagged. Recommended default: 40ms |
| B11 | Current damping level used by the turntable. Uses the mapping values from the F area |
| B12 | Represents how many degrees the turntable must rotate before damping takes effect. Larger values require more rotation. Try values between 2–16 |
| B13 | Restore turntable settings to factory defaults |
- In EZ2ON, it is recommended to use keyboard mode or DS4 mode, where the turntable reverse time interval can be independently set to 8ms without affecting global settings.
- If B6=10ms and turntable damping is set high, repeated output in the same direction is possible. Side effect: at slow speeds, the turntable will not respond.
4.3.3 Global - Light Settings
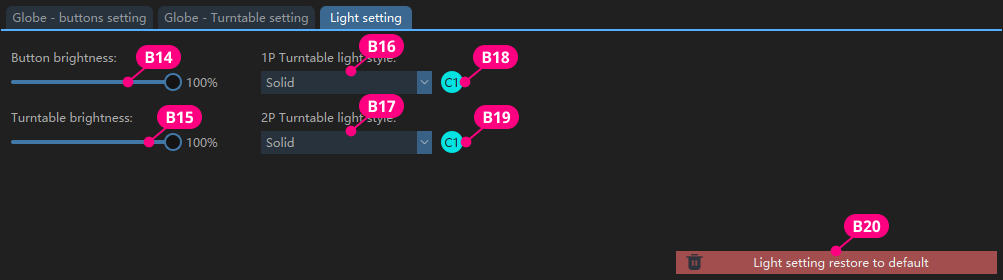
| Item | Description |
|---|---|
| B14 | Set button light brightness |
| B15 | Set turntable light brightness |
| B16, B17 | Select turntable light effect |
| B18, B19 | Click C1 or C2 to set the corresponding turntable light color. Cannot set rainbow color |
| B20 | Restore light settings to factory defaults |
4.4 Preview Window

| Item | Description |
|---|---|
| C1, C2 | Displays the voltage provided by the current PD power supply. 20V, 15V are recommended operating voltages; 12V can be used long-term; 9V works but is not recommended for extended use; 5V electromagnetic damping will not work; 0V means no PD power supply is connected |
| C3, C4 | Raw values of turntable data; not involved in actual output |
| C5 | Displays the currently pressed button |
| C6 | Switch the physical positions of 1P and 2P. Not recommended to click unless replacing the main control PCBA |
- Based on our experience, the Anker 140W PD power supply (with 3 Type-C ports and 1 Type-A port) can simultaneously provide 20V when two Type-C cables are connected.
- Recommended: one 140W PD power supply, or two 45W PD power supplies.
4.5 Firmware

| Item | Description |
|---|---|
| D1 | Displays the current hardware version and firmware version |
| D2 | Click to burn firmware |
| D3 | Click to open window and select the firmware to burn |
| D4 | Restore all parameters to factory settings (does not affect product lifespan) |
Do not disconnect the USB type-B interface during firmware burning. Otherwise, the motherboard PCBA may be damaged and cannot be repaired.
4.6 Modes
4.6.1 PS2 and BLE Mode
Use this mode when playing on PlayStation2, in combination with BE2PS.
Use this mode when playing beatmania IIDX ULTIMATE MOBILE, in combination with BE2BT.

| Item | Description |
|---|---|
| E1, E2 | Displays the absolute value of the X-axis output of the current 1P and 2P turntables |
| E3, E4 | Simulates the output of 1P and 2P turntables in the game |
| E5 | Independently set 1P and 2P parameters in this mode |
| E6 | Checked means use global settings; unchecked means ignore global settings and use parameters set in this mode |
| E7 | Set common parameters for 1P and 2P |
| E8 | Restore current mode to default values |
4.6.2 EAC2dx and HID Mode

| Item | Description |
|---|---|
| E9 | FN1, FN2 freely map any keyboard value |
| E10, E14 | Specify 1P turntable and 2P turntable output X-axis or Y-axis |
| E11, E15 | X-axis, Y-axis positive or negative direction |
| E12, E16 | Real-time display of current X-axis and Y-axis values |
| E13, E17 | Simulate the output state of the Turntable in the game |
| E18 | Independently set 1P and 2P parameters in this mode |
| E19 | Checked means use global settings; unchecked means ignore global settings and use parameters set in this mode |
| E20 | Set common parameters for 1P and 2P |
| E21 | Checked means receive spiceXXX damping data, which will automatically call LEVEL1–LEVEL10 values; unchecked uses the LEVEL specified by IIDXOLLER Options |
| E22 | Checked means receive spiceXXX downstream button light data; unchecked means lights glow when button is pressed |
| E23 | Checked means receive spiceXXX downstream turntable light data (single color only; if you want to use the ring light effect and color specified by IIDXOLLER Options, do not check) |
| E24 | Double play on INFINITAS; select E1 or E4 as the Start key according to your preference |
| E25 | Restore current mode to default values |
4.6.3 LR2 Mode
In this mode, the turntable output is a key value, with special optimizations for LR2.

| Item | Description |
|---|---|
| E26 | FN1, FN2 freely map any keyboard value |
| E27, E28 | Simulate the output state of the Turntable in LR2 |
| E29 | Independently set 1P and 2P parameters in this mode |
| E30 | Checked means use global settings; unchecked means ignore global settings and use parameters set in this mode |
| E31 | Set common parameters for 1P and 2P |
| E32 | Checked: press E1 and rotate 1P turntable to adjust 1P LaneCover |
| E33 | Checked: press E2 and rotate 1P turntable to adjust 1P LIFT |
| E34 | Checked: press E4 and rotate 2P turntable to adjust 2P LIFT |
| E35 | Restore current mode to default values |
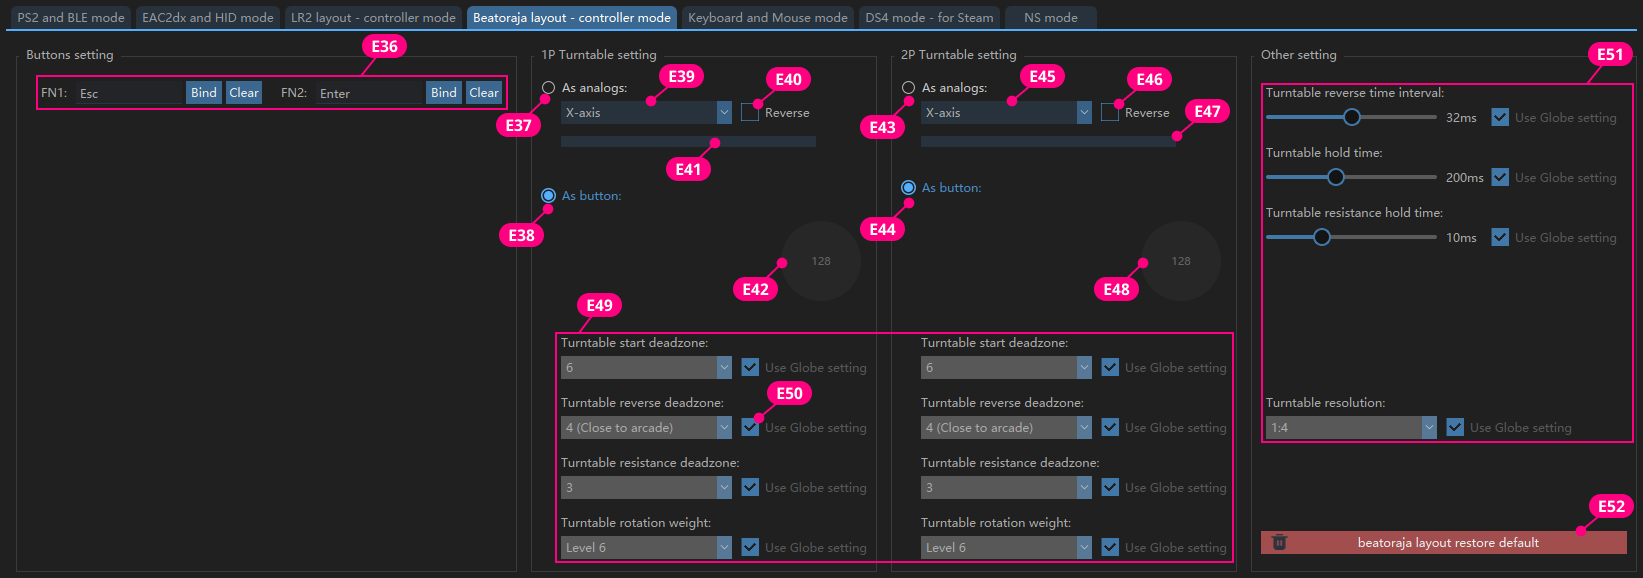
4.6.4 beatoraja Mode
In this mode, the turntable can output as key values or as an Axis.
| Item | Description |
|---|---|
| E36 | FN1, FN2 freely map any keyboard value |
| E37, E43 | Turntable output as analog value |
| E38, E44 | Turntable output as two different key values |
| E39, E45 | Select Turntable as X-axis or Y-axis |
| E40, E46 | Axis value increments or decrements |
| E41, E47 | Real-time display of current X-axis and Y-axis values |
| E42, E48 | Simulate turntable output state in beatoraja |
| E49 | Independently set 1P and 2P parameters in this mode |
| E50 | Checked means use global settings; unchecked means ignore global settings and use parameters set in this mode |
| E51 | Set common parameters for 1P and 2P |
| E52 | Restore current mode to default values |
4.6.5 Keyboard & Mouse Mode

| Item | Description |
|---|---|
| E53 | Customize key values for all buttons |
| E54 | Click the button, then press a keyboard key to complete custom key mapping |
| E55 | Clear the currently bound key value |
| E56, E62 | Turntable output as mouse |
| E57, E63 | Turntable output as keyboard value; clockwise and counterclockwise can be mapped to the same key value |
| E58, E64 | Select Turntable as X-axis or Y-axis |
| E59, E65 | Axis value increments or decrements |
| E60, E66 | Preview the increment/decrement of current turntable value |
| E61, E67 | Simulate turntable output state in the game |
| E68 | Independently set 1P and 2P parameters in this mode |
| E69 | Checked means use global settings; unchecked means ignore global settings and use parameters set in this mode |
| E70 | Set common parameters for 1P and 2P |
| E71 | Restore current mode to default values |
E57, E63: if mapped to the same keyboard value, it is recommended to increase the turntable reverse time interval to 8ms; too short an interval may cause some software to fail to recognize it.
4.6.6 PS4 Controller Mode
In this mode, the simulated output is a DS4 controller, which can be correctly recognized on Steam.

| Item | Description |
|---|---|
| E72 | Customize key values; can be set to any key value in DS4 |
| E73 | Select key value from the dropdown menu; takes effect immediately |
| E74, E80 | Turntable output as Axis |
| E75, E81 | Turntable output as key value; can map 2 identical key values or different key values |
| E76, E82 | Turntable selects the corresponding Axis |
| E77, E83 | Axis value increments or decrements |
| E78, E84 | Current Axis value output by the turntable |
| E79, E85 | Simulate turntable output state in the game |
| E86 | Independently set 1P and 2P parameters in this mode |
| E87 | Checked means use global settings; unchecked means ignore global settings and use parameters set in this mode |
| E88 | Set common parameters for 1P and 2P |
| E89 | Restore current mode to default values |
- E75, E81: if mapped to the same value, it is recommended to increase the turntable reverse time interval to 8ms; too short an interval may cause some software to fail to recognize it.
- E76, E82: if mapped to an Axis, button mapping cannot be mapped to an Axis.
4.6.7 NS Mode
This mode will be added in the future.
4.7 Turntable Damping Mapping
Turntable weight is a global setting. You can freely enter values from 0–100 based on your preference.

| Item | Description |
|---|---|
| F1 | Damping number input field; larger values mean greater damping |
| F2 | Click to save the current value; pressing Enter also saves |
| F3 | Restore factory default values |
- If you want constant damping, set LEVEL1–LEVEL10 to the same value.
- If you want a mix of damping and no damping, set LEVEL1–LEVEL5 to zero and LEVEL6–LEVEL10 to the same value.
- Feel free to set as you prefer.